
Roy Orbison - Crying Ukulele Chords
Before you play, tune your ukulele and use the tools below to set up your view and flow.
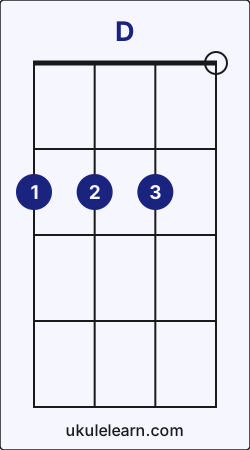
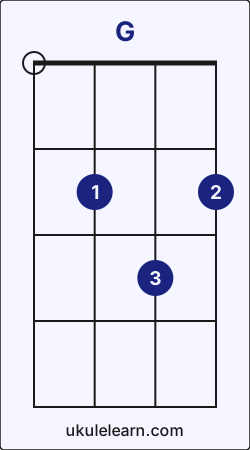
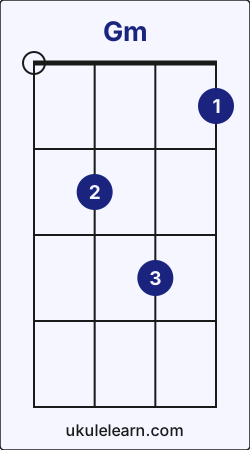
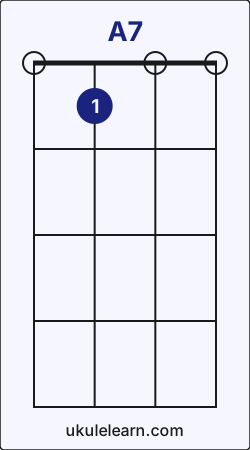
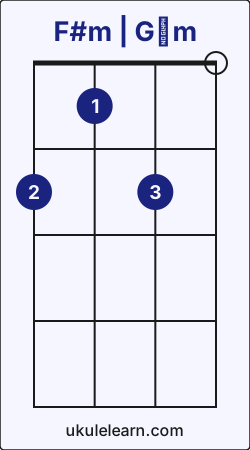
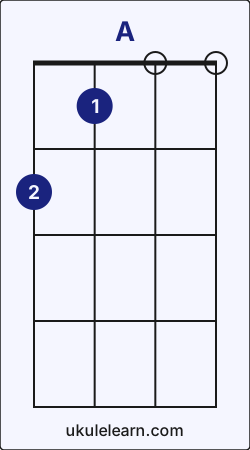
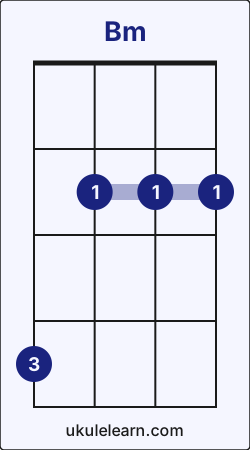
How to play Crying on Ukulele (Step-by-step)
Roy Orbison - Crying on ukulele requires 7 chords and 11 core chord transitions. You can find the full step-by-step guide below. Before you start, tune your instrument. The song uses the ↓↑-↓↑-↓↑-↓↑ pattern; practice it muted first, or simplify to downstrokes while you learn the changes.
Crying uses these transitions most often: A7 → D (5), D → G (5), and D → A7 (4). These transitions may feel a little challenging at first, but with steady practice you can play this song quickly.When you are ready, begin with D - G chord transition.
1. D → G chord transition
Here's how to move from D to G:
- Lift your index finger from G string fret 2 and place it on C string fret 2.
- Slide your middle finger from C string fret 2 to A string fret 2.
- Slide your ring finger on E string from fret 2 to fret 3.
This transition appears in the section, played 5 times.
2. G → Gm chord transition
Switching from G to Gm:
- Lift your index finger from C string fret 2 and place it on A string fret 1.
- Slide your middle finger from A string fret 2 to C string fret 2.
- Keep ring finger on E string fret 3.
This transition appears in the section, played 4 times.
3. Gm → D chord transition
Switching from Gm to D:
- Lift your index finger from A string fret 1 and place it on G string fret 2.
- Keep middle finger on C string fret 2.
- Slide your ring finger on E string from fret 3 to fret 2.
This transition appears in the section, played 4 times.
4. D → A7 chord transition
Switching from D to A7:
- While playing D, first lift your middle finger and ring finger.
- Lift your index finger from G string fret 2 and place it on C string fret 1.
This transition appears in the section, played 4 times.
5. D → F#m chord transition
Switching from D to F#m:
- Lift your index finger from G string fret 2 and place it on C string fret 1.
- Slide your middle finger from C string fret 2 to G string fret 2.
- Keep ring finger on E string fret 2.
This transition appears in the section, played 4 times.
6. F#m → G chord transition
Switching from F#m to G:
- Slide your index finger on C string from fret 1 to fret 2.
- Slide your middle finger from G string fret 2 to A string fret 2.
- Slide your ring finger on E string from fret 2 to fret 3.
This transition appears in the section, played 2 times.
7. G → A chord transition
Here's how to move from G to A:
- While playing G, lift your ring finger from E string fret 3.
- Slide your index finger on C string from fret 2 to fret 1.
- Slide your middle finger from A string fret 2 to G string fret 2.
This transition appears in the section, played 4 times.
8. A → D chord transition
Here's how to move from A to D:
- Lift your index finger from C string fret 1 and place it on G string fret 2.
- Slide your middle finger from G string fret 2 to C string fret 2.
- Place ring finger on E string fret 2.
This transition appears in the section, played 2 times.
9. D → Bm chord transition
Here's how to move from D to Bm:
- While playing D, lift your middle finger from C string fret 2.
- Lift your index finger from G string fret 2 and place it on C string fret 2.
- Slide your ring finger from E string fret 2 to G string fret 4.
This transition appears in the section.
10. Bm → G chord transition
Here's how to move from Bm to G:
- Keep index finger on C string fret 2.
- Lift your ring finger from G string fret 4 and place it on E string fret 3.
- Place middle finger on A string fret 2.
This transition appears in the section.
11. G → A7 chord transition
Switching from G to A7:
- While playing G, first lift your middle finger and ring finger.
- Slide your index finger on C string from fret 2 to fret 1.
This transition appears in the section.
Crying chord transition analysis
A short, data-driven summary of the chord flow in Crying.
- Crying includes 42 chord transitions, 11 of them unique.
- These transitions represent 0.01% of all chord transitions in Ukulelearn.
- Crying contains 2 of the top 10 transitions across Ukulelearn.
- These transition patterns show how Crying connects to the rest of Ukulelearn. Mastering them helps you move to similar songs faster.After D, the most likely next chords across Ukulelearn are G (28%), A (17%), and Em (17%).
- D → G: 28%
- D → Bm: 5%
After G, the most likely next chords across Ukulelearn are C (25%), D (24%), and Am (13%).- G → D: 24%
- G → A: 6%